# Readme

English | [简体中文](/readme-1)

## Overview

Welcome to MugglePay! A comprehensive cryptocurrency payment solution that enables merchants to accept crypto payments with minimal integration effort.

## Quick Start

Get started with MugglePay API in minutes. Follow our [Getting Started Guide](/faq/getstarted) to begin building your integration.

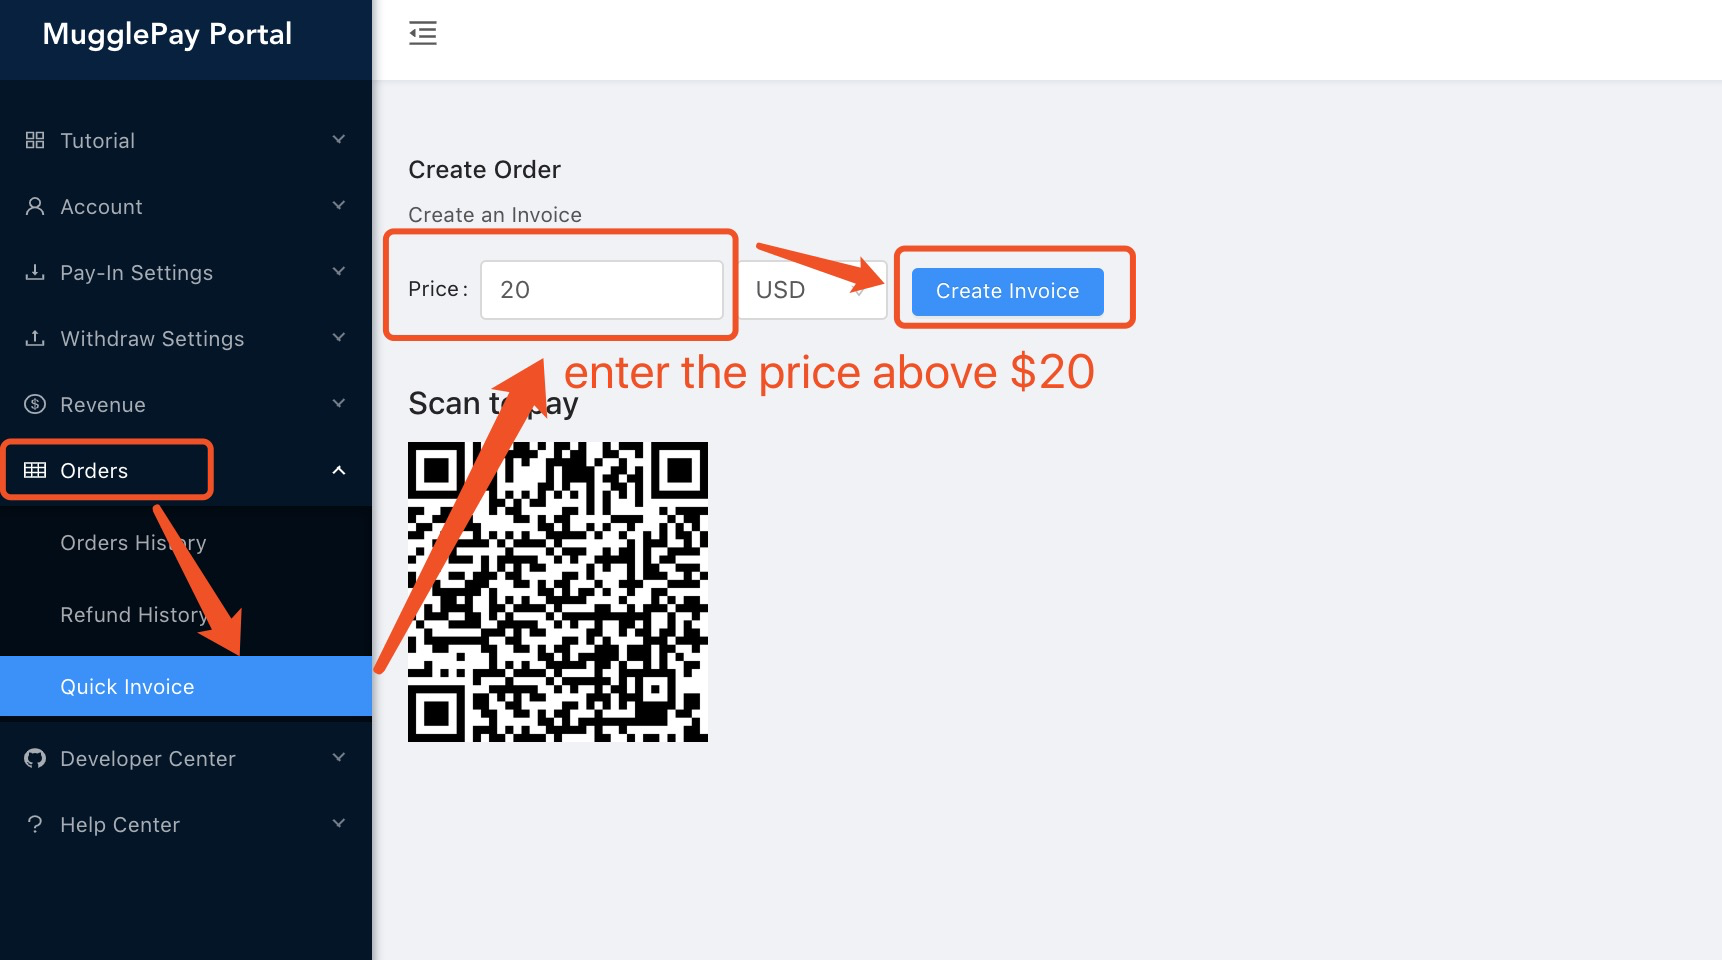
<div align="center"><img src="https://dcdn.mugglepay.com/dt/pay/docs/mp-create.png" alt="Create Order Flow" width="400"></div>

## Merchant Portal

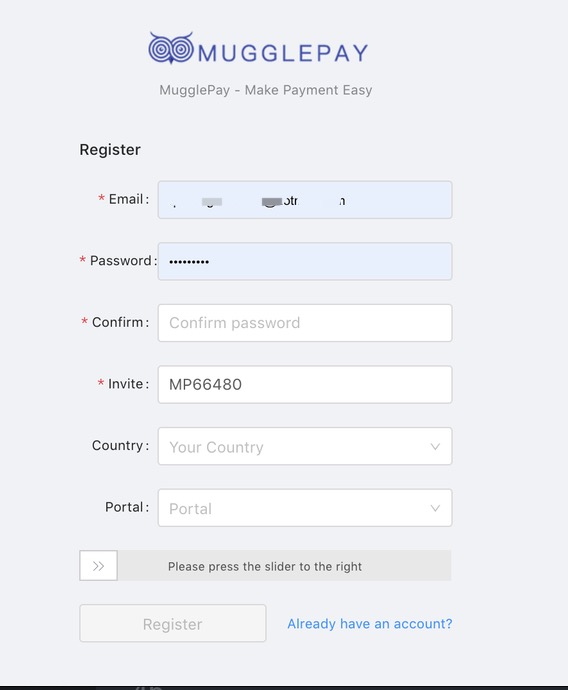
Access your developer API key and manage crypto orders through the [Merchant Portal](https://merchants.mugglepay.com/).

<div align="center"><img src="https://dcdn.mugglepay.com/dt/pay/docs/mp-login.png" alt="Merchant Login" width="250"></div>

## API Reference

<figure><img src="/files/BZux2BJUakkT5oS4of8T" alt="" width="375"><figcaption></figcaption></figure>

### Core Concepts

* [Getting Started](/faq/getstarted) - Quick integration guide
* [API Overview](/faq/overview) - Understanding MugglePay architecture
* [Order Status](/basic/orderstatus) - Payment status definitions
* [Error Codes](/basic/errorcodes) - Common error handling
* [Authentication](/basic/authentication) - API security and tokens

### Payment Operations

* [Create Order](/order/createorder) - Initialize payment requests
* [Payment Callback](/order/paymentcallback) - Webhook notifications
* [Get Order](/order/getorder) - Retrieve order details
* [Get Orders](/order/getorders) - List all orders
* [Checkout Order](/order/checkoutorder) - Select payment currency
* [Cancel Order](/order/cancelorder) - Cancel pending orders
* [Refund](/order/refund) - Process refunds

### Support & Resources

* [Customer FAQ](/faq/customerfaq) - Common user questions
* [Merchant FAQ](/faq/merchantfaq) - Integration troubleshooting
* [Self-Managed Solutions](/self-managed-non-custodian) - Advanced deployment options

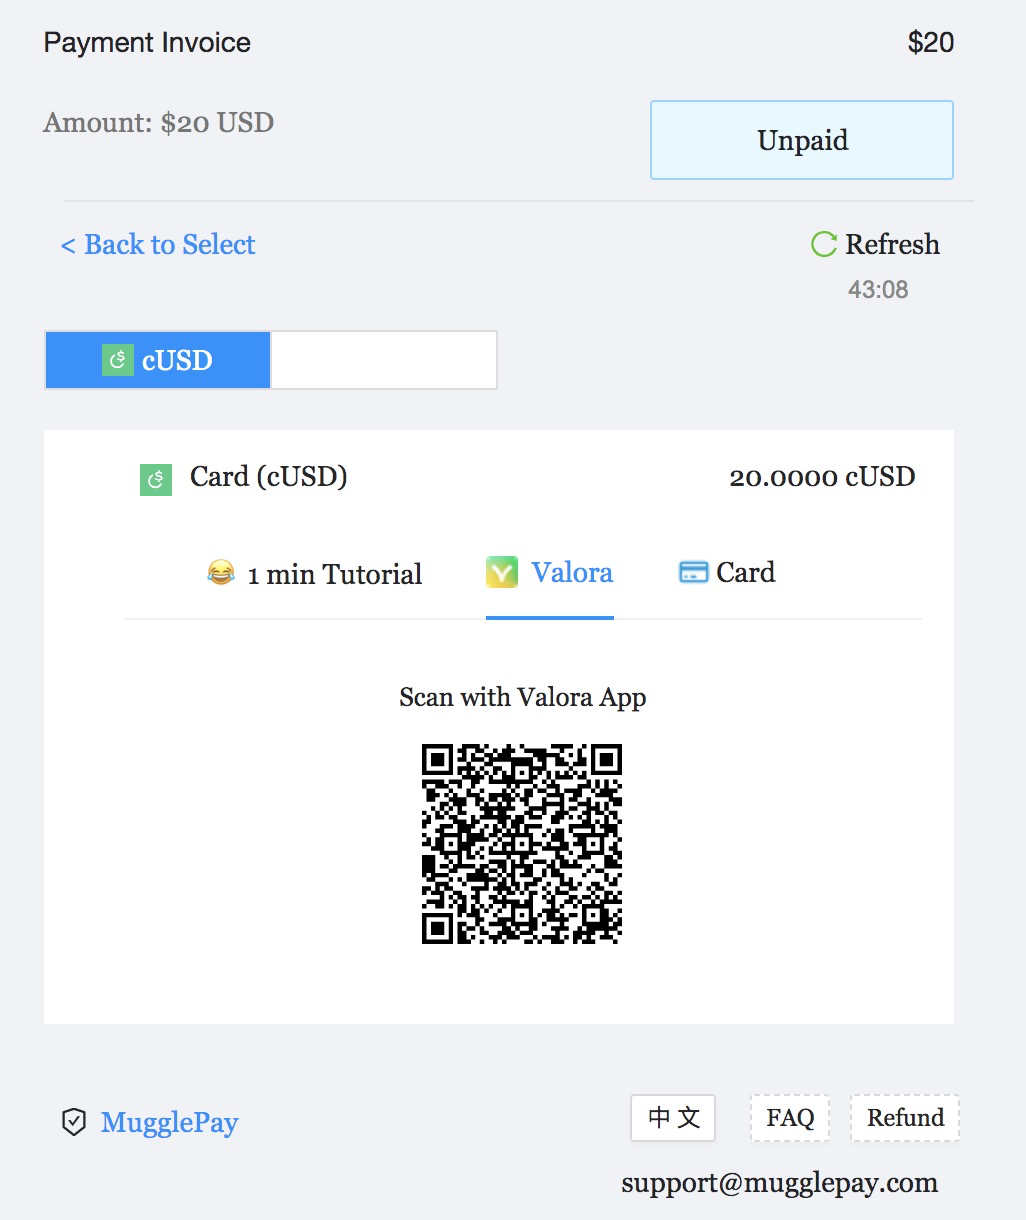
<div align="center"><img src="https://dcdn.mugglepay.com/dt/pay/docs/mp-payment.png" alt="Payment Flow" width="250"></div>

## Next Steps

1. **Read the** [**Getting Started Guide**](/faq/getstarted) to understand the integration flow
2. **Set up your** [**Merchant Account**](https://merchants.mugglepay.com/) to get your API keys
3. **Review** [**Authentication**](/basic/authentication) to secure your API calls
4. **Test with** [**Create Order**](/order/createorder) to build your first payment flow

## License

[BSD](https://www.wikiwand.com/en/BSD_licenses) Copyright (c) 2018-present, Muggles. All rights reserved.


# Readme-zh

简体中文 | [English](/)

[![](https://dcdn.mugglepay.com/dt/pay/logo/mplogo1.png)](https://www.mugglepay.com)

## 概述

欢迎使用 MugglePay！一个全面的加密货币支付解决方案，让商户能够以最少的集成工作接受加密支付。

## 快速开始

几分钟内即可开始使用 MugglePay API。请查看我们的[快速开始指南](/faq/getstarted)来开始构建您的集成。

<div align="center"><img src="https://dcdn.mugglepay.com/dt/pay/docs/mp-create.png" alt="创建订单流程" width="400"></div>

## 商户后台

通过[商户后台](https://merchants.mugglepay.com/)获取您的开发者 API 密钥并管理加密订单。

<div align="center"><img src="https://dcdn.mugglepay.com/dt/pay/docs/mp-login.png" alt="商户登录" width="250"></div>

## API 参考

### 核心概念

* [快速开始](/faq/getstarted) - 快速集成指南
* [API 概述](/faq/overview) - 了解 MugglePay 架构
* [订单状态](/basic/orderstatus) - 支付状态定义
* [错误代码](/basic/errorcodes) - 常见错误处理
* [接口认证](/basic/authentication) - API 安全和令牌

### 支付操作

* [创建订单](/order/createorder) - 初始化支付请求
* [支付回调](/order/paymentcallback) - Webhook 通知
* [获取订单](/order/getorder) - 检索订单详情
* [获取所有订单](/order/getorders) - 列出所有订单
* [选择订单支付货币](/order/checkoutorder) - 选择支付货币
* [取消订单](/order/cancelorder) - 取消待处理订单
* [退款](/order/refund) - 处理退款

### 支持与资源

* [用户常见问题](/faq/customerfaq) - 常见用户问题
* [商户常见问题](/faq/merchantfaq) - 集成故障排除
* [自托管解决方案](/self-managed-non-custodian) - 高级部署选项

<div align="center"><img src="https://dcdn.mugglepay.com/dt/pay/docs/mp-payment.png" alt="支付流程" width="250"></div>

## 下一步

1. **阅读**[**快速开始指南**](/faq/getstarted) 了解集成流程
2. **设置您的**[**商户账户**](https://merchants.mugglepay.com/) 获取 API 密钥
3. **查看**[**接口认证**](/basic/authentication) 确保 API 调用安全
4. **使用**[**创建订单**](/order/createorder) 测试构建您的第一个支付流程

## 版权

[BSD](https://www.wikiwand.com/en/BSD_licenses) Copyright (c) 2018-present, Muggles. 保留所有权利。


# API Status

* API Overview
  * [Getting Started](/faq/getstarted)
  * [Overview](/faq/overview)
  * [Order Status](/basic/orderstatus)
  * [Error Codes](/basic/errorcodes)
  * [Authentication](/basic/authentication)
* Payment API
  * [Create Order](/order/createorder)
  * [Payment Callback (Webhook)](/order/paymentcallback)
* In-House API
  * [Get Order](/order/getorder)
  * [Get Orders](/order/getorders)
  * [Checkout Order](/order/checkoutorder)
  * [Cancel Order](/order/cancelorder)
  * [Refund](/order/refund)


# Authentication

Secure your API calls with proper authentication. This guide explains how to authenticate your requests to the MugglePay API.

## Overview

All API calls to MugglePay require authentication using an API token. Keep your API token secure and never expose it in client-side code.

## API Token Authentication

### Getting Your API Token

1. Log in to the [Merchant Portal](https://merchants.mugglepay.com/)
2. Navigate to the API section
3. Copy your unique API token

### Using Your API Token

Include your API token in the `token` header of all authenticated requests:

```http
HTTP Header: 
token: YOUR_API_TOKEN_HERE
```

## Request Requirements

### Content-Type Header

All POST requests must include the `Content-Type: application/json` header:

```http
Content-Type: application/json
```

### Required vs Optional Fields

* **Required fields** are marked with "Yes" in the API documentation
* **Optional fields** can be omitted if not needed
* Fields marked with (\*) are required

## Rate Limits

### Free Plan Limits

1. **Create Order API: 500 requests per hour per user ID**
   * This limit applies to the `createOrder` (POST) API for merchants
   * If you reach the limit, wait for the timer to reset in an hour
2. **General API: 10,000 requests per hour per IP address**
   * This applies to all APIs regardless of authentication requirements
   * Includes GetOrder, CreateOrder, Checkout, and other APIs

### Increasing Limits

To increase your rate limits:

1. Create a ticket in the [Help Center](https://merchants.mugglepay.com/help/ticketcreate)
2. Contact customer service through the chat widget
3. Provide details about your expected usage

## Security Best Practices

### ✅ Do's

* Store your API token securely on your server
* Use HTTPS for all API calls
* Rotate your API token periodically
* Monitor your API usage for unusual activity

### ❌ Don'ts

* Never expose your API token in client-side code
* Don't commit API tokens to version control
* Avoid sharing API tokens between different applications
* Don't use the same token for development and production

## Code Examples

### cURL Example

```bash
curl -X POST \
  https://api.mugglepay.com/v1/orders \
  -H 'Content-Type: application/json' \
  -H 'token: YOUR_API_TOKEN_HERE' \
  -d '{
    "merchant_order_id": "order_123",
    "price_amount": 10.00,
    "price_currency": "USD"
  }'
```

### JavaScript Example

```javascript
const response = await fetch('https://api.mugglepay.com/v1/orders', {
  method: 'POST',
  headers: {
    'Content-Type': 'application/json',
    'token': 'YOUR_API_TOKEN_HERE'
  },
  body: JSON.stringify({
    merchant_order_id: 'order_123',
    price_amount: 10.00,
    price_currency: 'USD'
  })
});
```

### Python Example

```python
import requests

headers = {
    'Content-Type': 'application/json',
    'token': 'YOUR_API_TOKEN_HERE'
}

data = {
    'merchant_order_id': 'order_123',
    'price_amount': 10.00,
    'price_currency': 'USD'
}

response = requests.post(
    'https://api.mugglepay.com/v1/orders',
    headers=headers,
    json=data
)
```

## Common Authentication Errors

| Error Code            | Description                  | Solution                                                        |
| --------------------- | ---------------------------- | --------------------------------------------------------------- |
| `UNAUTHORIZED`        | Invalid or missing API token | Check your API token and ensure it's included in the header     |
| `TOKEN_EXPIRED`       | API token has expired        | Generate a new API token in the Merchant Portal                 |
| `RATE_LIMIT_EXCEEDED` | Too many requests            | Wait for rate limit reset or contact support to increase limits |

## Related Documentation

* [Create Order API](https://github.com/MugglePay/MugglePay/blob/master/API/basic/order/CreateOrder.md) - Learn how to use authentication with order creation
* [Error Codes](/basic/errorcodes) - Complete list of API error codes
* [Getting Started](https://github.com/MugglePay/MugglePay/blob/master/API/basic/faq/GetStarted.md) - Step-by-step integration guide

## Next Steps

1. **Test your authentication** by making a simple API call
2. **Review the** [**Create Order API**](https://github.com/MugglePay/MugglePay/blob/master/API/basic/order/CreateOrder.md) to see authentication in action
3. **Set up error handling** for authentication failures
4. **Monitor your API usage** to stay within rate limits


# HTTP Response and Error Codes

## API Errors

Most common API errors are as follows, including message, reason and status code.

Response example:

```
{
  "error": "API request limit is exceeded",
  "error_code": "API_LIMIT_EXCEEDED",
  "status": "400"
}
```

| status | error\_code                           | error                                                                                 |
| ------ | ------------------------------------- | ------------------------------------------------------------------------------------- |
| 400    | AUTHENTICATION\_FAILED                | Authentication Token is not set or expired.                                           |
| 400    | INVOICE\_NOT\_EXIST                   | Invoice does not exist.                                                               |
| 400    | INVOICE\_VERIFIED\_ALREADY            | It has been verified already.                                                         |
| 400    | INVOICE\_CANCELED\_FAIILED            | Invoice does not exist, or it cannot be canceled.                                     |
| 400    | ORDER\_NO\_PERMISSION                 | Order does not exist or permission denied.                                            |
| 400    | ORDER\_CANCELED\_FAIILED              | Order does not exist, or it cannot be canceled.                                       |
| 400    | ORDER\_REFUND\_FAILED                 | Order does not exist, or it\`s status is not refundable.                              |
| 400    | ORDER\_VERIFIED\_ALREADY              | Payment has been verified with payment already.                                       |
| 400    | ORDER\_VERIFIED\_PRICE\_NOT\_MATCH    | Payment money does not match the order money, please double check the price.          |
| 400    | ORDER\_VERIFIED\_MERCHANT\_NOT\_MATCH | Payment money does not the order of current merchant , please double check the order. |
| 400    | ORDER\_NOT\_VALID                     | Order id is not valid.                                                                |
| 400    | ORDER\_PAID\_FAILED                   | Order not exist or is not paid yet.                                                   |
| 400    | ORDER\_MERCHANTID\_EXIST              | Order with same merchant\_order\_id exisits.                                          |
| 400    | ORDER\_NOT\_NEW                       | The current order is not new, and payment method cannot be switched.                  |
| 400    | PAYMENT\_NOT\_AVAILABLE               | The payment method is not working, please retry later.                                |
| 400    | MERCHANT\_CALLBACK\_STATUS\_WRONG     | The current payment status not ready to send callback.                                |
| 400    | PARAMETERS\_MISSING                   | Missing parameters.                                                                   |
| 400    | PAY\_PRICE\_ERROR                     | Price amount or currency is not set correctly.                                        |
| 400    | CREDENTIALS\_NOT\_MATCH               | The email or password does not match.                                                 |
| 400    | USER\_NOT\_EXIST                      | The user does not exist or no permission.                                             |
| 400    | USER\_FAILED                          | The user operatioin failed.                                                           |
| 400    | INVITATION\_FAILED                    | The invitation code is not filled correctly.                                          |
| 400    | ERROR                                 | Error.                                                                                |
| 401    | (Unauthorized)                        | API credentials are not valid                                                         |
| 404    | (Not Found)                           | Page, action not found                                                                |
| 421    | (Too Many Requests)                   | API request limit is exceeded                                                         |
| 500    | (InternalServerError)                 | Server error in MugglePay                                                             |


# Order Status

Understand the different states of your payment orders and how to handle each status appropriately.

## Overview

Order status indicates the current state of a payment transaction. The most important statuses for merchants are **"NEW"** and **"PAID"**. When an order reaches "PAID" status, you should fulfill the customer's purchase.

Every status change triggers a [Payment Callback](/order/paymentcallback) to notify your system.

## Order Statuses

| Status              | Description                                                         | Action Required                              |
| ------------------- | ------------------------------------------------------------------- | -------------------------------------------- |
| **NEW**             | Order created, payment currency not yet selected                    | Wait for customer to select payment method   |
| **PENDING**         | Payment detected, waiting for blockchain confirmation               | Monitor for confirmation (varies by network) |
| **PAID**            | Payment confirmed and credited to merchant                          | ✅ **Fulfill customer's order**               |
| **UNRESOLVED**      | Payment confirmed but amount differs from expected                  | Review payment details and resolve manually  |
| **RESOLVED**        | Merchant has marked the payment as resolved                         | No action needed                             |
| **EXPIRED**         | Order expired without payment (60 min for crypto, 3 hours for fiat) | Create new order if customer wants to retry  |
| **CANCELED**        | Customer canceled the order                                         | No action needed, order cannot be paid       |
| **REFUND\_PENDING** | Refund request submitted, pending confirmation                      | Wait for refund to process                   |
| **REFUNDED**        | Payment has been refunded                                           | No action needed                             |

## Status Flow

```
1. NEW
   ↓
2. PENDING (payment detected)
   ↓
   ├─ CANCELED/EXPIRED (Final Status)
   ├─ UNRESOLVED → RESOLVED (Final Status)
   └─ PAID (Final Status)
       ↓
       └─ REFUNDED (Final Status)
```

## Detailed Status Explanations

### NEW

* **What it means**: Order has been created but customer hasn't selected a payment method yet
* **What happens**: Customer sees payment options and can choose their preferred cryptocurrency
* **Action needed**: None - wait for customer to proceed

### PENDING

* **What it means**: Customer has initiated payment, transaction detected on blockchain
* **Confirmation times**:
  * **Bitcoin**: \~10 minutes
  * **Ethereum**: \~1 minute
  * **EOS**: \~3 seconds
  * **Stable networks**: Usually 1-5 minutes
* **Action needed**: Monitor for confirmation, don't fulfill order yet

### PAID

* **What it means**: Payment fully confirmed and credited to your merchant account
* **What happens**: Customer is redirected to your success URL
* **Action needed**: ✅ **Immediately fulfill the customer's order** (deliver product, activate service, etc.)

### UNRESOLVED

* **What it means**: Payment confirmed but amount differs from expected
* **Common causes**:
  * **Overpaid**: Customer sent more than required
  * **Underpaid**: Customer sent less than required
  * **Delayed**: Payment arrived after order expiry
* **Action needed**: Review payment details and mark as resolved when appropriate

### EXPIRED

* **What it means**: Order expired without payment
* **Timing**:
  * **Crypto payments**: 60 minutes
  * **Fiat payments**: 3 hours
* **Action needed**: Create new order if customer wants to retry

### CANCELED

* **What it means**: Customer explicitly canceled the payment
* **What happens**: Customer is redirected to your cancel URL
* **Action needed**: None - order cannot be paid

## Handling Status Changes

### Automatic Notifications

* **Webhooks**: Receive real-time updates via [Payment Callback](/order/paymentcallback)
* **Email notifications**: Optional email alerts for status changes
* **Merchant Portal**: View all orders and statuses in real-time

### Manual Status Management

* **Resolve UNRESOLVED orders**: Mark as resolved when payment issues are handled
* **Monitor PENDING orders**: Track confirmation times for different networks
* **Handle EXPIRED orders**: Prompt customers to create new orders if needed

## Network-Specific Considerations

### Fast Networks (Arbitrum, Polygon, Base)

* **Confirmation time**: Usually 1-2 minutes
* **Gas fees**: Lower than Ethereum mainnet
* **Reliability**: High

### Ethereum Mainnet

* **Confirmation time**: 1-5 minutes (varies with network congestion)
* **Gas fees**: Higher during peak times
* **Reliability**: Very high

### Bitcoin Network

* **Confirmation time**: 10-60 minutes (1-6 confirmations)
* **Fees**: Varies with network congestion
* **Reliability**: Very high

## Troubleshooting

### Common Issues

#### Payment Not Confirming

* **Check network status**: Some networks may be congested
* **Verify transaction hash**: Use blockchain explorer to check status
* **Wait for confirmations**: Different networks require different confirmation counts

#### Order Expired

* **Check timing**: Crypto orders expire after 60 minutes
* **Create new order**: Customer needs to start fresh payment process
* **Update inventory**: Ensure product is still available

#### UNRESOLVED Status

* **Review payment details**: Check actual vs. expected amount
* **Contact customer**: Clarify payment intentions
* **Mark as resolved**: When payment issue is handled

## Best Practices

### ✅ Do's

* Always wait for "PAID" status before fulfilling orders
* Monitor PENDING orders for confirmation
* Handle UNRESOLVED orders promptly
* Use webhooks for real-time status updates
* Keep customers informed about payment status

### ❌ Don'ts

* Don't fulfill orders on PENDING status
* Don't ignore UNRESOLVED payments
* Don't assume payment will confirm automatically
* Don't create duplicate orders for expired payments

## Related Documentation

* [Payment Callback](https://github.com/MugglePay/MugglePay/blob/master/API/basic/order/PaymentCallback.md) - Handle status change notifications
* [Create Order](https://github.com/MugglePay/MugglePay/blob/master/API/basic/order/CreateOrder.md) - Initialize new payment orders
* [Get Order](https://github.com/MugglePay/MugglePay/blob/master/API/basic/order/GetOrder.md) - Check current order status
* [Error Codes](/basic/errorcodes) - Understand error responses

## Next Steps

1. **Set up webhook handling** to receive real-time status updates
2. **Implement order fulfillment logic** for PAID status
3. **Create monitoring dashboard** to track order statuses
4. **Test with small amounts** to understand the complete flow


# FAQs

Welcome to the MugglePay FAQ section. Here you'll find answers to common questions about using MugglePay for cryptocurrency payments.

## Table of Contents

### Getting Started

* [**Get Started**](/faq/getstarted) - Complete integration guide for merchants
* [**Overview**](/faq/overview) - MugglePay architecture and API overview

### Common Questions

#### For Merchants

* [**Merchant FAQ**](/faq/merchantfaq) - Frequently asked questions from merchants
* [**常见问题**](/faq/chang-jian-wen-ti) - 商户常见问题 (Chinese)

#### For Customers

* [**Customer FAQ**](/faq/customerfaq) - Frequently asked questions from customers

### Supported Tokens & Networks

* [**Supported Tokens**](https://github.com/MugglePay/MugglePay/blob/master/API/faq/SupportedTokens.md) - Complete list of supported cryptocurrencies and networks with pay\_currency codes

## Quick Navigation

* **New to MugglePay?** Start with [Get Started](/faq/getstarted)
* **Need API details?** Check [Overview](/faq/overview)
* **Merchant issues?** See [Merchant FAQ](/faq/merchantfaq)
* **Customer support?** Visit [Customer FAQ](/faq/customerfaq)

## Support

If you can't find the answer you're looking for in these FAQs, please contact our support team:

* **Merchants:** Submit tickets through the [Merchant Portal](https://merchants.mugglepay.com/)
* **General inquiries:** <business@mugglepay.com>
* **Documentation:** [Main API Documentation](/)


# Customer FAQ

[English](/faq/customerfaq) | [简体中文](/faq/chang-jian-wen-ti)

## Order not confirmed or expired or waiting for blockchain

If you have paid with cryptocurrencies (e.g. USDT/ USDC), you can see the txHash or txID and blockchain explorer URL from your platforms. First, check if the transaction is confirmed on the blockchain. If it's confirmed, please check the amount is correct and the order is paid within the time window.

Blockchain usually takes some time to confirm based on differet blockchain networks. If your order cannot confirm after 60 minutes, or If the order is expired or you pay a different amount.

* send the email to <support@mugglepay.com> with the attachments:
* txHash and blockchain explorer URL - this will show the exact amount and time you have paid (please copy text).
* invoice id and URL - this will show the amount you need to pay (please copy text)

![txhash](https://user-images.githubusercontent.com/50819254/113534525-8bd51d00-9603-11eb-864e-977a2d2e0bca.jpg) ![txhash2](https://user-images.githubusercontent.com/50819254/113534522-88da2c80-9603-11eb-8ed7-b4d2a6e2f6c6.jpg)

##

## Order not confirmed - Top Reason 1 (Price not match, price volatility issues)

When you pay from your crypto exchanges (Coinbase, Binance, Huobi, OKEx), they usually charge a withdrawal fee.

For example, the withdraw fee charged by the exchange is 1 USDT for USDT-Tron and 16 USDT for USDT-Ethereum. The withdrawal fee should be covered by yourself.

For example, if your order is 128.8 USDT and you want to pay USDT-TRC20 from Binance. Currently Binance USDT-TRC20 withdrawal fee is 1 USDT. MugglePay need to receive exactly 128.8, and you should withdraw 129.8 USDT from Binance to cover the withdrawal fee.

If you do not pay the withdrawal fee, and merchant will receive less amount. The order will be marked as expired after 60 minutes. Please contact our support email as soon as possible.

The solution might be paying the missing fee (e.g. 1 USD as the example), or refund the rest of the money (you might need to cover the cost).

## Order not confirmed - Top Reason 2 (Credit Card)

Credit card processing sometimes take a longer time, especially crypto related (due to the credit card risk engine).

For example, if your order is 99 USD and you paid 100 USD from your credit card. The credit card company will charge the processing fee.

![cardpayment](https://user-images.githubusercontent.com/50819254/113794626-90254580-977d-11eb-91d6-a5948639d42b.png)

If you have not received a confirmation like the screenshots above, the money might be on hold by your bank. Please wait for the confirmation, and let us know if you have the payment receipt like above.

* send the email to <support@mugglepay.com> with the attachments:
* invoice id or url - this will show the amount you need to pay (also copy text)
* credit card payment receipt - this will show the exact amount and time you have paid (also copy text).

## Order not confirmed - Top Reason 3 (Expired, payment timeout)

By default the payment time window is 10 minutes to 1 hour based on the merchant order configations. However, blockchain payments sometimes take a longer time, even hours.

If you pay with stablecoins like USDC, USDT on Tron, Ethereum, Arbitrum, we will mark the order as paid automatically within 24 hours. Even though are orders are expired.

If you pay the invoice for more than 24 hours, it will show as expired after the payment window.

If order shows expired

* send the email to <support@mugglepay.com> with the attachments:
* invoice id or url - this will show the amount you need to pay (also copy text)
* txHash and blockchain exploerer url - this will show the exact amount and time you have paid (also copy text).

## What is Arbitrum?

[*Arbitrum*](https://arbitrum.io/) is the leading Layer 2 technology that empowers you to explore and build in the largest Layer 1 ecosystem, Ethereum.

## Contact

Email: <support@mugglepay.com> TG: <https://telegram.me/mugglepay> and ask for admin support.


# Get started

Integrate MugglePay cryptocurrency payments into your website in minutes. This guide walks you through the complete setup process.

## Overview

MugglePay provides a pre-built payment page and complete checkout experience that can be branded for your business. Integrate once and gain new features as MugglePay evolves.

## Prerequisites

* A website or application that needs to accept payments
* Basic knowledge of HTTP APIs and webhooks
* Access to your server's backend code

## Integration Steps

### Step 1: Register and Get API Key

1. **Create Merchant Account**
   * Visit the [Merchant Portal](https://merchants.mugglepay.com/)
   * Sign up with your invitation code
   * Complete your merchant profile

![](http://dcdn.mugglepay.com/dt/pay/docs/mp-login.png)

2. **Get Your API Key**
   * Navigate to the API section in your dashboard
   * Copy your unique API authentication token
   * Keep this token secure - never expose it in client-side code

![](http://dcdn.mugglepay.com/dt/pay/docs/mp-apikey.png)

**Learn more**: [Authentication Guide](/basic/authentication)

### Step 2: Integrate Payment Button

#### 2.1 Add Payment Button

Choose from our pre-designed payment buttons or create your own:

![](http://dcdn.mugglepay.com/dt/pay/button/mpay-icon.png)

#### 2.2 Button Integration Example

```html
<!-- Basic payment button -->
<button onclick="createPayment()" class="payment-btn">
  Pay with Crypto
</button>

<script>
async function createPayment() {
  try {
    const response = await fetch('/api/create-order', {
      method: 'POST',
      headers: {
        'Content-Type': 'application/json'
      },
      body: JSON.stringify({
        price_amount: 29.99,
        price_currency: 'USD',
        title: 'Premium Subscription'
      })
    });
    
    const result = await response.json();
    if (result.payment_url) {
      window.location.href = result.payment_url;
    }
  } catch (error) {
    console.error('Payment creation failed:', error);
  }
}
</script>
```

### Step 3: Create Order API Integration

When a customer clicks the payment button, your backend should call the [Create Order API](/order/createorder):

![](http://dcdn.mugglepay.com/dt/pay/docs/mp-create.png)

#### Backend Implementation Example

```javascript
// Node.js/Express example
app.post('/api/create-order', async (req, res) => {
  try {
    const orderData = {
      merchant_order_id: generateOrderId(),
      price_amount: req.body.price_amount,
      price_currency: req.body.price_currency,
      title: req.body.title,
      description: req.body.description,
      callback_url: 'https://yoursite.com/webhooks/payment',
      success_url: 'https://yoursite.com/success',
      cancel_url: 'https://yoursite.com/cart'
    };

    const response = await fetch('https://api.mugglepay.com/v1/orders', {
      method: 'POST',
      headers: {
        'Content-Type': 'application/json',
        'token': process.env.MUGGLEPAY_API_TOKEN
      },
      body: JSON.stringify(orderData)
    });

    const result = await response.json();
    res.json(result);
  } catch (error) {
    res.status(500).json({ error: 'Order creation failed' });
  }
});
```

### Step 4: Handle Payment Flow

#### 4.1 Redirect to Payment Page

After successful order creation, redirect customers to the MugglePay payment page:

![](http://dcdn.mugglepay.com/dt/pay/docs/mp-payment.png)

#### 4.2 Payment Callback (Webhook)

Set up webhook handling to receive real-time payment notifications:

```javascript
// Webhook endpoint example
app.post('/webhooks/payment', async (req, res) => {
  const { order_id, status, merchant_order_id } = req.body;
  
  if (status === 'PAID') {
    // Fulfill the customer's order
    await fulfillOrder(merchant_order_id);
  }
  
  res.status(200).send('OK');
});
```

**Important**: If you're not receiving webhook notifications, check:

* Your `callback_url` is correctly set in the Create Order request
* Your webhook endpoint is publicly accessible
* Use the [Merchant Portal](https://merchants.mugglepay.com/transactions/orders) to manually trigger callbacks for testing

### Step 5: Testing and Validation

#### 5.1 Test Your Integration

1. **Create test orders** with small amounts
2. **Test the complete flow** from button click to payment completion
3. **Verify webhook notifications** are received correctly
4. **Test error scenarios** (expired orders, cancellations)

#### 5.2 Monitor in Merchant Portal

Track all transactions and orders in the [Merchant Portal](https://merchants.mugglepay.com/):

![](http://dcdn.mugglepay.com/dt/pay/docs/mp-admin.png)

## Complete Integration Example

Here's a minimal working example:

```html
<!DOCTYPE html>
<html>
<head>
    <title>MugglePay Integration</title>
</head>
<body>
    <h1>Product Store</h1>
    <div class="product">
        <h2>Premium Subscription</h2>
        <p>Get access to all premium features</p>
        <p class="price">$29.99</p>
        <button onclick="buyProduct()">Buy Now</button>
    </div>

    <script>
        async function buyProduct() {
            try {
                // Create order on your backend
                const response = await fetch('/api/create-order', {
                    method: 'POST',
                    headers: { 'Content-Type': 'application/json' },
                    body: JSON.stringify({
                        price_amount: 29.99,
                        price_currency: 'USD',
                        title: 'Premium Subscription',
                        description: 'Monthly premium access'
                    })
                });
                
                const result = await response.json();
                
                if (result.payment_url) {
                    // Redirect to MugglePay payment page
                    window.location.href = result.payment_url;
                } else {
                    alert('Failed to create order: ' + result.error);
                }
            } catch (error) {
                alert('Error: ' + error.message);
            }
        }
    </script>
</body>
</html>
```

## Best Practices

### ✅ Do's

* Test with small amounts before going live
* Implement proper error handling
* Use HTTPS for all API calls
* Store API tokens securely
* Monitor webhook delivery

### ❌ Don'ts

* Don't expose API tokens in client-side code
* Don't skip webhook validation
* Don't assume payments will always succeed
* Don't forget to handle edge cases

## Troubleshooting

### Common Issues

#### Webhook Not Receiving Notifications

* **Check URL accessibility**: Ensure your webhook endpoint is publicly accessible
* **Verify callback\_url**: Make sure it's correctly set in Create Order requests
* **Test manually**: Use the Merchant Portal to trigger test callbacks

#### Order Creation Fails

* **Check API token**: Verify your authentication token is correct
* **Required fields**: Ensure all required parameters are provided
* **Rate limits**: Check if you've exceeded API rate limits

#### Payment Not Confirming

* **Network congestion**: Some blockchain networks may be slow
* **Order expiry**: Orders expire after 60 minutes (crypto) or 3 hours (fiat)
* **Contact support**: Reach out if issues persist

## Related Documentation

* [Create Order API](/order/createorder) - Detailed API reference
* [Payment Callback](/order/paymentcallback) - Webhook handling guide
* [Order Status](/basic/orderstatus) - Understanding payment states
* [Authentication](/basic/authentication) - API security guide
* [Error Codes](/basic/errorcodes) - Common error solutions

## Next Steps

1. **Complete the integration** following this guide
2. **Test thoroughly** with small amounts
3. **Set up monitoring** for your payment flow
4. **Go live** with real customers
5. **Optimize** based on usage patterns

## Need Help?

* **Documentation**: Browse our complete [API reference](/)
* **Support**: Contact us through the [Merchant Portal](https://merchants.mugglepay.com/)
* **Community**: Join our developer community for tips and best practices


# Merchant FAQ

## How to get a donation? Can I create order without price amount?

Yes. Set the price\_amount = 0 when you create the order. Check the [API Doc here](https://docs.mugglepay.com/order/createorder)

After the order is created, the buyer will enter the price amount for the order. The price\_amount only be set only once.

## Why self-manged invoices are not the same as my own wallet address?

When you're in self-custodial (self-managed) mode, you have direct control over receiving tokens. For EVM-compatible chains like Arbitrum, Base, or BNB Chain, we utilize non-custodial smart contracts to forward payments on your behalf.

These smart contracts manage the initial receipt of funds, you maintain complete control over accessing and transferring the tokens received.

## Should I register with Email or Web3 Wallets?

If you want to accept crypto into your own wallets, we suggest you register with your own Web3. It supports self-custodial (self-managed) mode. No account registeration. No withdraw needed. Read [more](https://docs.mugglepay.com/self-managed-non-custodian)

If you want a one stop solution for your website, to accept different tokens on different blockchains. E.g. USDT, USDC on different chains like Ethereum, Ton, Solana, Binance, Layer2 like Arbitrum, . We suggest you register with your email with the simple mode.

## Do you have a Testnet or dev environment for integration?

If you want to integrate with MugglePay, we will send you $0.1 worth of USDT to your account. You can create orders as $0.01 USD for your integration. How to get $0.1 USDT as follows

* Register a Web3 account (e.g. with MetaMask ), and have your address ready.
* Register a MugglePay account, and create a Ticket in Help Center.
* Write down your  address and we will send you USDV on Arbitrum network&#x20;
  * Create order with pay\_currrency = USDV\_ARB

## What if I forgot my password?

If you’ve lost or forgotten your password, you can contact your account manager who gave you the invitation code.

## How do I withdraw money?

You can withdraw USDT, USDC, BTC, EOS from the MugglePay Dashboard by clicking on the "Withdraw" button. On Tuesdays, we will automatically withdraw money for you. On the first withdrawal, you will need to contact your account manager to confirm the coin address.

## What is the cost of withdrawal?

EOS withdrawals are free. The withdrawal fee for USDT (OMINI) is $3.50.

## How to exchange cryptocurrency for US dollars?

Method 1: You can exchange the cryptocurrency for US dollars on the exchange, such as GDAX, Huobi. Method 2: You can exchange the cryptocurrency for Bitcoin on the exchange, such as Binance. And you can exchange Bitcoin for USD on OTC exchange, such as Coincola.

## I want to pay by digital currency, but what if I don't have cryptocurrency?

You can purchase cryptocurrency on your credit card at Binance. Or buy cryptocurrency at Huobi via Alipay and bank card. After buying the cryptocurrency, you need to withdraw it to your wallet for payment.

## Why I can't get the callback request after a payment finished?

If you can't get the callback request after a payment finished, you should check if you correctly pass the `callback_url` params when you send a create order request. Additionally, ensure that the URL starts with **`https`** instead of **`http`**. You also can check the url at [Merchants Order History Page](https://merchants.mugglepay.com/transactions/orders) by click Triger **Payment Callback** button and make sure that the callback response returns a **200 OK** status with `{ status: 200 }` in the body content. Otherwise, the request will be identified as failed, and the system will retry several times. For more details, refer to the [MugglePay documentation](https://docs.mugglepay.com/order/paymentcallback).


# API Overview

MugglePay expands your payment options by accepting instant payments of cryptocurrencies, including USDT, EOS, BTC, BCH, LTC and etc, without price fluctuations and chargeback risks. We provide a reliable payments solution that helps both you and your customers: safe, convenient and customer oriented.

## Get started

You can accept payments today on MugglePay in an easy way. MugglePay is a pre-built payment page and complete checkout experience that can be branded for your business. Integrate once, gain new features as MugglePay evolves.

Use the following steps to create a Checkout page that lets a customer make a one-time payment or subscribe to recurring payment plans:

* Register and Get API Key
* Integrate with MugglePay Checkout on your website.
* Integration test for MugglePay.

### Step 1. Register and Get API Key

Register your MugglePay merchant accounts with your invitation code and get your API key at [Merchants Portal](https://merchants.mugglepay.com/).

![](http://dcdn.mugglepay.com/dt/pay/docs/mp-login.png)

You will find your API Auth Token (API key) for authentication. [MORE](/basic/authentication)

![](http://dcdn.mugglepay.com/dt/pay/docs/mp-apikey.png)

### Step 2. Integrate MugglePay Checkout with your website

#### 2.1 Add the Button

To integrate Checkout on your website, you need to add a payment button first. Some images options can be found\
![](http://dcdn.mugglepay.com/dt/pay/button/mpay-en.png) ![](http://dcdn.mugglepay.com/dt/pay/button/mpay-zh.png) ![](http://dcdn.mugglepay.com/dt/pay/button/mpay-icon.png) ![](http://dcdn.mugglepay.com/dt/pay/button/mpay-en-black.png)

\
![](http://dcdn.mugglepay.com/dt/pay/docs/mp-checkout2.png)

#### 2.2 Send Request to Create Order

The button should trigger [Create Order](/order/createorder) a request with purchase order information. It tells us the price amount, description, and merchant ID generated by your service.

![](http://dcdn.mugglepay.com/dt/pay/docs/mp-create.png)

#### 2.3 Redirect user to Payment Page

After the Create Order succeeds, you should redirect the customer to MugglePay payment\_url URL and redirects the customer to Crypto Payment page, which contains the purchase order information provided by [Create Order](/order/createorder).

![](http://dcdn.mugglepay.com/dt/pay/docs/mp-payment.png)

#### 2.4 Payment Callback (Webhook)

When your customer successfully completes their payment, they are redirected to the success URL that you specified. Typically, this is a page on your website that informs the customer that their payment was successful. The cancel URL is the page where Checkout redirects customers when they cancel the payment process.

Once payment is successful, you should fulfill the customer’s purchase. You can use [Payment Callback](/order/paymentcallback) webhooks to fulfill the purchase when callback event triggers.

***

**NOTE**

If you can't get the callback request after a payment finished, you should check if you correctly pass the `callback_url` params when you send a create order request. You also can check the url at [Merchants Order History Page](https://merchants.mugglepay.com/transactions/orders) by click Triger **Payment Callback** button

***

### Step 3. Integration test

Once the integration has been completed, there will then be testing from our team to ensure it's functionality. If all checks pass, it will be ready to go.

All the transactions of orders and withdraws can be viewed in the [Merchants Portal](https://merchants.mugglepay.com/).

![](http://dcdn.mugglepay.com/dt/pay/docs/mp-admin.png)


# 客户常见问题解答

[English](/faq/customerfaq) | [简体中文](/faq/chang-jian-wen-ti)

## 订单未确认或已过期或正在等待区块链

如果您使用加密货币付款（例如USDT /以太坊ETH / USDC），则可以从平台上看到txHash或txID以及区块链浏览器URL。 首先检查交易是否在区块链上被确认。如果确认，请检查金额是否正确，并在时间范围内付款。

区块链通常需要一些时间来基于不同的区块链网络进行确认。如果您在60分钟后无法确认订单，或者订单已过期或您支付了其他金额。将带有附件的电子邮件发送至<support@mugglepay.com>：

* MugglePay支付订单id或者支付链接 - 这将显示您需要支付的金额
* txHash和区块链浏览器链接 - 上面会显示您已支付的具体金额 和 转账时间。请务必发txHash以及区块链浏览器链接，因为这个是您的付款凭证。

![txhash](https://user-images.githubusercontent.com/50819254/113534525-8bd51d00-9603-11eb-864e-977a2d2e0bca.jpg){: width="60%"} ![txhash2](https://user-images.githubusercontent.com/50819254/113534522-88da2c80-9603-11eb-8ed7-b4d2a6e2f6c6.jpg){: width="60%"}

## 订单未确认 - 最常见问题（价格不匹配）

当您从加密交易所（Coinbase，Binance，Huobi，OKEx）付款时，它们通常收取提款费。

例如，交易所收取的提款费是0.007 ETH，USDT-Tron为1 USDT，USDT-Ethereum为12 USDT。 您应该自己支付提款费。

例如，如果您的订单是128.8 USDT，而您想从Binance支付USDT-TRC20。 目前Binance USDT-TRC20的取款费用为1 USDT。 MugglePay需要收到确切的128.8，您应该从Binance提取129.8 USDT以支付提取费用。

如果您的交易所扣除了提款费，那么MugglePay没有收到足够的金额。 该订单将在60分钟后标记为过期。 尽快通过联系方式联系我们的客服电子邮件 或者 加入 TG群。

## 联系我们

* 电子邮件：<support@mugglepay.com>
* TG：<https://telegram.me/mugglepay> 并寻求管理员支持。


# API Order

* API Overview
  * [Getting Started](/faq/getstarted)
  * [Overview](/faq/overview)
  * [Order Status](/basic/orderstatus)
  * [Error Codes](/basic/errorcodes)
  * [Authentication](/basic/authentication)
* Payment API
  * [Create Order](/order/createorder)
  * [Payment Callback (Webhook)](/order/paymentcallback)
* In-House API
  * [Get Order](/order/getorder)
  * [Get Orders](/order/getorders)
  * [Checkout Order](/order/checkoutorder)
  * [Cancel Order](/order/cancelorder)
  * [Refund](/order/refund)


# Cancel Order

If the customer wants to switch to USDT after selecting BTC. She/he will cancel order and reselect. It’s done by MugglePay Invoice page. ONLY use this if you want to build an in-house payment without redirecting to MugglePay Invoice page.

It is to avoid order conflict, if the client cannot get successful payment result or any response from MugglePay, it should send a cancel request to MugglePay to cancel the failed order.

Use it when the order status is NEW.

***

## Definition

**POST** <https://api.mugglepay.com/v1/orders/:order\\_id/cancel>

## Body Params

| Param     | Type     | Required | Description                                                        |
| --------- | -------- | -------- | ------------------------------------------------------------------ |
| order\_id | `string` | Yes      | MugglePay order ID. It's provided in the response of Create Order. |

## Example

```
curl -X POST \
  https://api.mugglepay.com/v1/orders/8cbe9c33-7b0d-4b03-816f-e88a3c6bfa5c \
  -H 'token: API_TOKEN_GET_FROM_ADMIN_PORTAL'
	
```


# Checkout Order

Based on the purchase amount, the customer can select payment currency for the order. The response will have the pay\_amount and payment\_address. You can redirect the buyer to the payment\_url.

It's done by our side. ONLY use this if you want to build an in-house payment without redirecting to our page. This API is only needed with no page redirecting.

***

## Definition

**POST** <https://api.mugglepay.com/v1/orders/:id/checkout>

## Body Params

| Param         | Type     | Required | Description                                                                     |
| ------------- | -------- | -------- | ------------------------------------------------------------------------------- |
| order\_id     | `string` |          | MugglePay order ID                                                              |
| pay\_currency | `string` | Yes      | Payment cryptocurrency. It's currency selected by the user. For example, "EOS". |

## Result Format

MugglePay Server will always return status 200 on success API.

### 200 OK

```
{
    "status": 200,
    "order": {
        "order_id": "8cbe9c00-7b0d-4b03-816f-e88a3c6bfa5c",
        "user_id": 14309,
        "merchant_order_id": "ORDER_16800000000_1_1556124035619",
        "title": "Order 5619",
        "description": "Membership 2019.03: $9.9,
        "callback_url": "https://ecards.com/api/success",
        "cancel_url": "https://ecards.com/ecardstatus?status=cancel",
        "success_url": "https://ecards.com/ecardstatus?status=success",
        "token": "ECARDSxxxsd1",
        "price_amount": 9.9,
        "price_currency": "USD",
        "receive_currency": "",
        "status": "PAID",
        "created_at": "2019-04-24T16:40:36.264Z",
        "updated_at": "2019-04-24T16:41:01.000Z",
        "deleted": 0
    },
    "invoice": {
        "invoice_id": "7707ce37-aad6-4a9d-94b4-821db7c7a958",
        "order_id": "8cbe9c00-7b0d-4b03-816f-e88a3c6bfa5c",
        "pay_amount": 3.0712,
        "pay_currency": "EOS",
        "status": "PAID",
        "created_at": "2019-04-24T16:40:36.350Z",
        "created_at_t": 1556124036350,
        "expired_at": "2019-04-24T16:45:41.000Z",
        "expired_at_t": 1556124341000,
        "merchant_order_id": "ORDER_16800000000_1_1556124035619",
        "receive_amount": 9.9,
        "receive_currency": "USD"
    }
}
```

### Error Format

MugglePay Server will always return status 400. If API failed, it will return error\_code and error as its object.

```
{
    "status": 400,
    "error_code": "ORDER_NO_PERMISSION",
    "error": "Order does not exist or permission denied."
}
```

## Notes

If you want the user to stay at your website, a QR code can generated based on the pay\_amount and payment\_address. Buyer can scan the QR code with any crypto wallets on their mobiles.


# Create Order

Create a new payment order to accept cryptocurrency payments from your customers. This is the primary API for initiating payments on MugglePay.

## Overview

The Create Order API performs two main functions:

1. **Creates a payment invoice** with your specified details (price, title, description)
2. **Generates a payment URL** where customers can complete their crypto payment

This is the **ONLY API** you need to integrate MugglePay payments into your website.

## API Endpoint

**POST** `https://api.mugglepay.com/v1/orders`

## Request Parameters

| Parameter           | Type      | Required | Description                                                                                                                                                                                   |
| ------------------- | --------- | -------- | --------------------------------------------------------------------------------------------------------------------------------------------------------------------------------------------- |
| `merchant_order_id` | `string`  | No       | Your custom order identifier. Recommended to use your application's order ID for easy tracking.                                                                                               |
| `price_amount`      | `double`  | **Yes**  | The payment amount in your specified currency (e.g., 9.99)                                                                                                                                    |
| `price_currency`    | `string`  | **Yes**  | The currency for your pricing (e.g., USD). Defaults to USD if not specified.                                                                                                                  |
| `pay_currency`      | `string`  | No       | Specific cryptocurrency for payment (e.g., ETH\_BASE, USDT\_ARB, USDC\_BASE). If not specified, customer can choose.                                                                          |
| `title`             | `string`  | No       | Order title (max 200 characters). Examples: "Apple iPhone 15", "Order #12345", "Monthly Subscription"                                                                                         |
| `description`       | `string`  | No       | Detailed order description (max 800 characters). Examples: "1x iPhone 15 Pro, 1x AirPods"                                                                                                     |
| `email`             | `string`  | No       | Customer email address for payment receipt. When provided, a receipt email will be sent to this address after successful payment.                                                             |
| `callback_url`      | `string`  | No       | Webhook URL for payment status updates. We'll notify this URL when payment status changes.                                                                                                    |
| `cancel_url`        | `string`  | No       | Redirect URL when customer cancels payment. Usually your cart or checkout page.                                                                                                               |
| `success_url`       | `string`  | No       | Redirect URL after successful payment. Usually your order confirmation page.                                                                                                                  |
| `mobile`            | `boolean` | No       | Optimize payment page for mobile devices if set to `true`.                                                                                                                                    |
| `fast`              | `boolean` | No       | Return payment URL directly without additional processing.                                                                                                                                    |
| `merchant_token`    | `string`  | No       | Custom token set by merchant for webhook validation. It's useful for merchant to verify the API is from MugglePay. It's different from the API authentication token from the Merchant Portal. |

## Supported Cryptocurrencies

We support major stable tokens and networks. If `pay_currency` is specified, customers will only see that payment option. Note: pay\_currency is different from price\_currency. price\_currency is the label currency like USD.

| `pay_currency` | Token | Network     | Description                      |
| -------------- | ----- | ----------- | -------------------------------- |
| `USDT_ARB`     | USDT  | Arbitrum    | Fast and low-cost USDT transfers |
| `USDC_ARB`     | USDC  | Arbitrum    | Stable USDC on Arbitrum network  |
| `ETH_ARB`      | ETH   | Arbitrum    | Native ETH on Arbitrum           |
| `USDC_ERC20`   | USDC  | Ethereum    | USDC on Ethereum mainnet         |
| `USDT_ERC20`   | USDT  | Ethereum    | USDT on Ethereum mainnet         |
| `USDC_SOL`     | USDC  | Solana      | USDC on Solana network           |
| `USDC_POL`     | USDC  | Polygon     | USDC on Polygon network          |
| `TON`          | TON   | Ton Network | Native TON cryptocurrency        |
| `USDT_TON`     | USDT  | Ton Network | USDT on Ton Network              |
| `USDT_BNB`     | USDT  | BNB Chain   | USDT on BNB Smart Chain          |
| `USDT_CELO`    | USDT  | Celo        | USDT on Celo network             |
| `CUSD`         | CUSD  | Celo        | Celo Dollar stablecoin           |
| `USDC_BASE`    | USDC  | Base        | USDC on Coinbase's Base network  |
| `ETH_BASE`     | ETH   | Base        | ETH on Base network              |

**Coming Soon:** Stellar, ICP networks

## Code Examples

### cURL Example

```bash
curl -X POST \
  https://api.mugglepay.com/v1/orders \
  -H 'Content-Type: application/json' \
  -H 'token: YOUR_API_TOKEN_HERE' \
  -d '{
    "merchant_order_id": "order_12345",
    "price_amount": 29.99,
    "price_currency": "USD",
    "title": "Premium Subscription",
    "description": "Monthly premium access to all features",
    "email": "customer@example.com",
    "callback_url": "https://yoursite.com/webhooks/payment",
    "success_url": "https://yoursite.com/success",
    "cancel_url": "https://yoursite.com/cart"
  }'
```

### JavaScript Example

```javascript
const createOrder = async (orderData) => {
  try {
    const response = await fetch('https://api.mugglepay.com/v1/orders', {
      method: 'POST',
      headers: {
        'Content-Type': 'application/json',
        'token': 'YOUR_API_TOKEN_HERE'
      },
      body: JSON.stringify(orderData)
    });
    
    const result = await response.json();
    
    if (result.status === 201) {
      // Redirect customer to payment page
      window.location.href = result.payment_url;
    } else {
      console.error('Order creation failed:', result.error);
    }
  } catch (error) {
    console.error('Network error:', error);
  }
};

// Usage
createOrder({
  merchant_order_id: 'order_12345',
  price_amount: 29.99,
  price_currency: 'USD',
  title: 'Premium Subscription',
  description: 'Monthly premium access to all features',
  email: 'customer@example.com',
  callback_url: 'https://yoursite.com/webhooks/payment',
  success_url: 'https://yoursite.com/success',
  cancel_url: 'https://yoursite.com/cart'
});
```

### Python Example

```python
import requests
import json

def create_order(order_data):
    url = 'https://api.mugglepay.com/v1/orders'
    headers = {
        'Content-Type': 'application/json',
        'token': 'YOUR_API_TOKEN_HERE'
    }
    
    try:
        response = requests.post(url, headers=headers, json=order_data)
        result = response.json()
        
        if result['status'] == 201:
            print(f"Order created successfully!")
            print(f"Payment URL: {result['payment_url']}")
            return result
        else:
            print(f"Order creation failed: {result['error']}")
            return None
            
    except requests.exceptions.RequestException as e:
        print(f"Network error: {e}")
        return None

# Usage
order_data = {
    'merchant_order_id': 'order_12345',
    'price_amount': 29.99,
    'price_currency': 'USD',
    'title': 'Premium Subscription',
    'description': 'Monthly premium access to all features',
    'email': 'customer@example.com',
    'callback_url': 'https://yoursite.com/webhooks/payment',
    'success_url': 'https://yoursite.com/success',
    'cancel_url': 'https://yoursite.com/cart'
}

result = create_order(order_data)
```

## Request Body Example

```json
{
  "merchant_order_id": "order_12345",
  "price_amount": 29.99,
  "price_currency": "USD",
  "title": "Premium Subscription",
  "description": "Monthly premium access to all features",
  "email": "customer@example.com",
  "callback_url": "https://yoursite.com/webhooks/payment",
  "success_url": "https://yoursite.com/success",
  "cancel_url": "https://yoursite.com/cart",
  "token": "custom_webhook_token_123"
}
```

## Response Format

### Success Response (200 OK)

```json
{
  "status": 201,
  "order": {
    "user_id": 32014,
    "merchant_order_id": "order_12345",
    "title": "Premium Subscription",
    "description": "Monthly premium access to all features",
    "email": "customer@example.com",
    "callback_url": "https://yoursite.com/webhooks/payment",
    "cancel_url": "https://yoursite.com/cart",
    "success_url": "https://yoursite.com/success",
    "price_amount": 29.99,
    "price_currency": "USD",
    "pay_amount": 29.99,
    "pay_currency": "USD",
    "order_id": "94be2b2a-2905-4857-b701-b04e57e84593",
    "status": "NEW",
    "created_at": "2024-01-15T10:30:00.000Z",
    "updated_at": "2024-01-15T10:30:00.000Z"
  },
  "payment_url": "https://invoice.mugglepay.com/invoices?id=94be2b2a-2905-4857-b701-b04e57e84593"
}
```

### Error Response (400 Bad Request)

```json
{
  "status": 400,
  "error_code": "PARAMETERS_MISSING",
  "error": "Missing required parameters: price_amount, price_currency"
}
```

## Important Notes

* **Payment URL**: After successful order creation, redirect customers to the `payment_url` where they can select their preferred cryptocurrency and complete payment
* **Settlement**: Payments in USD or stable currencies are settled immediately
* **Order Expiry**: Orders expire after 60 minutes for crypto payments, 3 hours for fiat payments
* **Webhooks**: Use the `callback_url` to receive real-time payment status updates

## Tips & Best Practices

### ✅ Do's

* Always include a unique `merchant_order_id` for easy tracking
* Use descriptive titles and descriptions for better customer experience
* Test your webhook endpoints before going live
* Handle both success and error responses appropriately

### ❌ Common Mistakes

* Forgetting to include the `Content-Type: application/json` header
* Using the same `merchant_order_id` for multiple orders
* Not handling webhook failures gracefully
* Missing error handling for failed API calls

## Related Documentation

* [Payment Callback](/order/paymentcallback) - Learn how to handle payment notifications
* [Order Status](https://github.com/MugglePay/MugglePay/blob/master/API/order/basic/OrderStatus.md) - Understand different order states
* [Authentication](https://github.com/MugglePay/MugglePay/blob/master/API/order/basic/Authentication.md) - Secure your API calls
* [Error Codes](https://github.com/MugglePay/MugglePay/blob/master/API/order/basic/ErrorCodes.md) - Handle API errors properly

## Next Steps

1. **Test the API** with small amounts in sandbox mode
2. **Set up webhook handling** to receive payment notifications
3. **Implement error handling** for failed order creation
4. **Review** [**Payment Callback**](/order/paymentcallback) to complete the payment flow


# Get Order

Retrieving a specific order by MugglePay order ID

It's done by MugglePay payment page. ONLY use this if you want to build an in-house payment without redirecting.

***

## Definition

**GET** <https://api.mugglepay.com/v1/orders/:order\\_id>

## Body Params

<table><thead><tr><th width="211">Param</th><th>Type</th><th>Required</th><th>Description</th></tr></thead><tbody><tr><td>order.order_id</td><td><code>string</code></td><td>Yes</td><td>MugglePay order ID. It's provided in the response of Create Order.</td></tr><tr><td>order.price_amount</td><td>Float</td><td>Yes</td><td>Label Price in USD (e.g. FIAT Lable price). In this example, it's $9.9 in US Dollars</td></tr><tr><td>invoice.pay_amount</td><td>Float</td><td>Yes</td><td>Token amount in Token. In this example, it's 9.9 USDC Token on Solana.  </td></tr><tr><td>invoice.pay_currency</td><td>string</td><td>Yes</td><td>The crypto currency we want to pay. In this example, it's USDC_SOL (USDC on Solana) </td></tr><tr><td>invoice.memo</td><td>string</td><td>No</td><td>If you are using MugglePay invoice page, it's automatically handled if user pay with crypto wallets. If you want to customize your payment page, add the memo when paying the transaction. It's optional for most  payments. It's required for payments like TON, Solana.</td></tr></tbody></table>

## Example

```
curl -X GET \
  https://api.mugglepay.com/v1/orders/8cbe9c00-7b0d-4b03-816f-e88a3c6bfa5c \
  -H 'token: API_TOKEN_GET_FROM_ADMIN_PORTAL'
	
```

## Result Format

### 200 OK

```
{
  status: 200,
  merchant: {},
  order: {
    order_id: 'd84cc10f-9e88-4783-9fb0-3a7b9aea8de4',
    user_id: '48443257-84ec-498f-b5b1-541082858651',
    merchant_order_id: 'Order_ID_1736446203980',
    title: 'Order: Online English Class',
    description: 'Amount: $9.9 USD',
    callback_url: '',
    cancel_url: '',
    success_url: '',
    price_amount: 9.9,  # Label Price in USD (e.g. FIAT Lable price)
    price_currency: 'USD',
    status: 'NEW',
    notified: 'NEW',
    paid_at: null,
    created_at: '2025-01-09T18:10:04.329Z',
    updated_at: '2025-01-09T18:10:10.000Z',
    pay_amount: 9.9,
    pay_currency: 'USD',
    is_self: false,
    salt: 704327
  },
  invoice: {
    invoice_id: 'dc5425bf-29fa-4b59-bc20-2203e05a8eed',
    order_id: 'd84cc10f-9e88-4783-9fb0-3a7b9aea8de4',
    pay_amount: 9.9,     # Token amount in Token (e.g. 9.9 USDC Token on Solana)
    pay_currency: 'USDC_SOL',
    status: 'NEW',
    created_at: '2025-01-09T18:10:20.437Z',
    created_at_t: 1736446220437,
    expired_at: '2025-01-09T19:10:20.000Z',
    expired_at_t: 1736449820000,
    merchant_order_id: 'Order_ID_1736446203980',
    receive_amount: 9.9,
    receive_currency: 'USD',
    qrcode: 'BtFAMxkNJ6LfVFGFK9qXiEv8hytkaacBYz19xzLrAx7F',
    address: 'BtFAMxkNJ6LfVFGFK9qXiEv8hytkaacBYz19xzLrAx7F',
    memo: '325242'      # Add the memo when paying the transaction.
  },
  permission: ''
}
```

### Error Format

MugglePay Server will always return status 400. If API failed, it will return error\_code and error as its object.

```
{
  "eror": "Order not found",
  "error_code": "ORDER_NOT_VALID",
  "status": "400"
}
```


# Get Orders

Retrieving information of all orders.

It's done by MugglePay payment page. ONLY use this if you want to build an in-house payment without redirecting.

***

## Definition

**GET** <https://api.mugglepay.com/v1/orders/>

## Query Params

| Param  | Type          | Required | Description                                       |
| ------ | ------------- | -------- | ------------------------------------------------- |
| status | `Status Type` |          | E.g. PAID. Default all statuses.                  |
| limit  | `integer`     |          | numbers of orders per page. Max: 50. Default: 10. |
| offset | `integer`     |          | starting item. Default: 0.                        |

## Example

```

curl -X GET \
  'https://api.mugglepay.com/v1/orders?limit=20&offset=10' \
  -H 'token: TOKEN_FROM_ADMIN_PORTAL'


```

## Result Format

### 200 OK

```
{
    "status": 200,
    "orders": [
        {
            "order_id": "xxx-b17d-4805-b311-b95cd2d66ad0",
            "user_id": 14109,
            "merchant_order_id": "Order #5630",
            "title": "Order 5630",
            "description": "Membership $0.15",
            "callback_url": "https://ecards.com/api/success",
            "cancel_url": "https://ecards.com/ecardstatus?status=cancel",
            "success_url": "https://ecards.com/ecardstatus?status=success",
            "token": "Ex1asdfasdf",
            "price_amount": 0.15,
            "price_currency": "USD",
            "receive_currency": "",
            "status": "NEW",
            "created_at": "2019-01-24T16:52:50.021Z",
            "updated_at": "2019-01-24T16:52:50.021Z",
            "deleted": 0
        },
        {
            "order_id": "xxx-7b0d-4b03-816f-e88a3c6bfa5c",
            "user_id": 14109,
            "merchant_order_id": "Order #5619",
            "title": "Order 5619",
            "description": "Membership $0.15",
            "callback_url": "https://ecards.com/api/success",
            "cancel_url": "https://ecards.com/ecardstatus?status=cancel",
            "success_url": "https://ecards.com/ecardstatus?status=success",
            "token": "Exdasdfasdf",
            "price_amount": 0.15,
            "price_currency": "USD",
            "receive_currency": "",
            "status": "PAID",
            "created_at": "2019-01-24T16:40:36.264Z",
            "updated_at": "2019-01-24T16:41:01.000Z",
            "deleted": 0
        }
    ]
}
```


# Payment Callback (Webhook)

Receive real-time notifications when payment status changes. Webhooks are the primary way to stay updated on order status and automatically fulfill customer orders.

## Overview

MugglePay sends webhook events to notify your application whenever an order status changes. This is the **ONLY backend mechanism** you need to track payment status and automatically fulfill orders.

## Use Cases

Webhooks enable you to:

* **Update customer records** when subscription payments succeed
* **Send confirmation emails** after successful payments
* **Log accounting entries** when transfers are completed
* **Update inventory** when orders are paid
* **Activate services** immediately upon payment confirmation

## Webhook Configuration

### Setting Up Your Endpoint

1. **Provide callback URL** in your [Create Order](/order/createorder) request
2. **Ensure endpoint is public** and accessible from the internet
3. **Handle POST requests** with JSON payloads
4. **Return HTTP 200** to acknowledge receipt

### Authentication

Webhooks are authenticated using the `merchant_token` field you provide in the Create Order request. This prevents fraudulent callback attempts.

## Request Details

### HTTP Method

* **Method**: POST
* **Content-Type**: application/json
* **Authentication**: Token-based (from Create Order)

### Response Requirement

Your webhook endpoint must return HTTP 200 with this JSON response:

```json
{
  "status": 200
}
```

## Webhook Payload Structure

| Field               | Type     | Description                                        |
| ------------------- | -------- | -------------------------------------------------- |
| `order_id`          | `string` | MugglePay's internal order identifier              |
| `merchant_order_id` | `string` | Your custom order ID from Create Order             |
| `status`            | `string` | Current payment status (NEW, PENDING, PAID, etc.)  |
| `price_amount`      | `string` | Original price set by merchant (e.g., "29.99")     |
| `price_currency`    | `string` | Currency for pricing (e.g., "USD")                 |
| `pay_amount`        | `string` | Actual amount paid by customer                     |
| `pay_currency`      | `string` | Currency used for payment                          |
| `created_at`        | `string` | ISO 8601 timestamp of order creation               |
| `created_at_t`      | `number` | Unix timestamp (epoch) of order creation           |
| `merchant_token`    | `string` | Your custom merchant\_token for webhook validation |
| `meta`              | `object` | Additional payment information (optional)          |

## Code Examples

### Node.js/Express Example

```javascript
const express = require('express');
const app = express();

app.use(express.json());

app.post('/webhooks/payment', async (req, res) => {
  try {
    const {
      order_id,
      merchant_order_id,
      status,
      price_amount,
      price_currency,
      merchant_token
    } = req.body;

    // Validate webhook token
    if (!validateWebhookToken(merchant_token)) {
      console.error('Invalid webhook merchant_token');
      return res.status(401).json({ error: 'Unauthorized' });
    }

    // Handle different status changes
    switch (status) {
      case 'PAID':
        await fulfillOrder(merchant_order_id);
        console.log(`Order ${merchant_order_id} paid successfully`);
        break;
      
      case 'EXPIRED':
        await handleExpiredOrder(merchant_order_id);
        console.log(`Order ${merchant_order_id} expired`);
        break;
      
      case 'CANCELED':
        await handleCanceledOrder(merchant_order_id);
        console.log(`Order ${merchant_order_id} canceled`);
        break;
      
      default:
        console.log(`Order ${merchant_order_id} status: ${status}`);
    }

    // Always return 200 to acknowledge receipt
    res.json({ status: 200 });
    
  } catch (error) {
    console.error('Webhook processing error:', error);
    // Still return 200 to prevent retries
    res.json({ status: 200 });
  }
});

function validateWebhookToken(merchant_token) {
  // Implement your token validation logic
  return merchant_token === process.env.WEBHOOK_TOKEN;
}

async function fulfillOrder(merchantOrderId) {
  // Implement order fulfillment logic
  // Update database, send confirmation email, etc.
}

app.listen(3000, () => {
  console.log('Webhook server running on port 3000');
});
```

### Python/Flask Example

```python
from flask import Flask, request, jsonify
import os

app = Flask(__name__)

@app.route('/webhooks/payment', methods=['POST'])
def payment_webhook():
    try:
        data = request.get_json()
        
        # Extract webhook data
        order_id = data.get('order_id')
        merchant_order_id = data.get('merchant_order_id')
        status = data.get('status')
        token = data.get('token')
        
        # Validate webhook token
        if not validate_webhook_token(token):
            print(f"Invalid webhook token for order {merchant_order_id}")
            return jsonify({'error': 'Unauthorized'}), 401
        
        # Process status change
        if status == 'PAID':
            fulfill_order(merchant_order_id)
            print(f"Order {merchant_order_id} fulfilled successfully")
        elif status == 'EXPIRED':
            handle_expired_order(merchant_order_id)
            print(f"Order {merchant_order_id} expired")
        elif status == 'CANCELED':
            handle_canceled_order(merchant_order_id)
            print(f"Order {merchant_order_id} canceled")
        
        # Return success response
        return jsonify({'status': 200})
        
    except Exception as e:
        print(f"Webhook processing error: {e}")
        # Return 200 even on error to prevent retries
        return jsonify({'status': 200})

def validate_webhook_token(token):
    return token == os.environ.get('WEBHOOK_TOKEN')

def fulfill_order(merchant_order_id):
    # Implement order fulfillment logic
    pass

if __name__ == '__main__':
    app.run(debug=True, port=3000)
```

### PHP Example

```php
<?php
// webhook.php

// Get webhook data
$webhook_data = json_decode(file_get_contents('php://input'), true);

// Validate webhook token
$expected_token = $_ENV['WEBHOOK_TOKEN'];
$received_token = $webhook_data['token'] ?? '';

if ($received_token !== $expected_token) {
    http_response_code(401);
    echo json_encode(['error' => 'Unauthorized']);
    exit;
}

// Extract webhook fields
$order_id = $webhook_data['order_id'];
$merchant_order_id = $webhook_data['merchant_order_id'];
$status = $webhook_data['status'];
$price_amount = $webhook_data['price_amount'];
$price_currency = $webhook_data['price_currency'];

// Process status change
switch ($status) {
    case 'PAID':
        fulfillOrder($merchant_order_id);
        error_log("Order {$merchant_order_id} paid successfully");
        break;
    
    case 'EXPIRED':
        handleExpiredOrder($merchant_order_id);
        error_log("Order {$merchant_order_id} expired");
        break;
    
    case 'CANCELED':
        handleCanceledOrder($merchant_order_id);
        error_log("Order {$merchant_order_id} canceled");
        break;
    
    default:
        error_log("Order {$merchant_order_id} status: {$status}");
}

// Return success response
http_response_code(200);
echo json_encode(['status' => 200]);

function fulfillOrder($merchantOrderId) {
    // Implement order fulfillment logic
    // Update database, send confirmation email, etc.
}

function handleExpiredOrder($merchantOrderId) {
    // Handle expired order logic
}

function handleCanceledOrder($merchantOrderId) {
    // Handle canceled order logic
}
?>
```

## Sample Webhook Payload

```json
{
  "merchant_order_id": "order_12345",
  "order_id": "94be2b2a-2905-4857-b701-b04e57e84593",
  "status": "PAID",
  "price_amount": "29.99",
  "price_currency": "USD",
  "pay_amount": "29.99",
  "pay_currency": "USD",
  "created_at": "2024-01-15T10:30:00.000Z",
  "created_at_t": 1705312200000,
  "token": "your_custom_token_123",
  "meta": {
    "payment": "USDT_ARB",
    "transaction_hash": "0x1234...",
    "network": "Arbitrum"
  }
}
```

## Retry Mechanism

MugglePay automatically retries failed webhook deliveries using exponential backoff:

| Attempt   | Delay       | Total Time         |
| --------- | ----------- | ------------------ |
| 1st       | 1 minute    | 1 minute           |
| 2nd       | 2 minutes   | 3 minutes          |
| 3rd       | 4 minutes   | 7 minutes          |
| 4th       | 8 minutes   | 15 minutes         |
| 5th       | 16 minutes  | 31 minutes         |
| 6th       | 32 minutes  | 63 minutes         |
| 7th       | 64 minutes  | 2 hours 7 minutes  |
| 8th       | 128 minutes | 4 hours 15 minutes |
| 9th       | 256 minutes | 8 hours 31 minutes |
| Continues | Doubles     | Up to 3 days       |

**Important**: Always return HTTP 200 to prevent unnecessary retries.

## Security Best Practices

### ✅ Do's

* **Validate webhook tokens** to prevent fraud
* **Use HTTPS** for all webhook endpoints
* **Implement idempotency** to handle duplicate webhooks
* **Log all webhook events** for debugging
* **Return HTTP 200** even on processing errors

### ❌ Don'ts

* Don't ignore webhook validation
* Don't expose webhook endpoints without authentication
* Don't return error codes that trigger retries
* Don't process webhooks synchronously for long operations

## Testing Webhooks

### Local Development

1. Use tools like [ngrok](https://ngrok.com/) to expose local endpoints
2. Test with small amounts in sandbox mode
3. Verify webhook delivery and processing

### Manual Testing

* Use the [Merchant Portal](https://merchants.mugglepay.com/transactions/orders)
* Click "Trigger Payment Callback" button for testing
* Monitor webhook delivery in your logs

## Troubleshooting

### Common Issues

#### Webhook Not Receiving

* **Check endpoint accessibility**: Ensure your URL is publicly accessible
* **Verify callback\_url**: Confirm it's correctly set in Create Order
* **Check firewall settings**: Ensure incoming POST requests are allowed
* **Test manually**: Use Merchant Portal to trigger test callbacks

#### Webhook Processing Errors

* **Validate merchant token**: Ensure webhook merchant\_token matches your expected value
* **Check payload structure**: Verify all required fields are present
* **Handle errors gracefully**: Return 200 even when processing fails
* **Monitor logs**: Check for specific error messages

#### Duplicate Webhooks

* **Implement idempotency**: Process each webhook only once
* **Check order\_id**: Use unique identifiers to prevent duplicates
* **Database constraints**: Add unique constraints on order processing

## Related Documentation

* [Create Order](/order/createorder) - Set up webhook endpoints
* [Order Status](https://github.com/MugglePay/MugglePay/blob/master/API/order/basic/OrderStatus.md) - Understand status values
* [Authentication](https://github.com/MugglePay/MugglePay/blob/master/API/order/basic/Authentication.md) - Secure your webhooks
* [Getting Started](https://github.com/MugglePay/MugglePay/blob/master/API/order/faq/GetStarted.md) - Complete integration guide

## Next Steps

1. **Implement webhook endpoint** following the examples above
2. **Test webhook delivery** with small test orders
3. **Add order fulfillment logic** for PAID status
4. **Monitor webhook processing** in production
5. **Set up alerting** for webhook failures


# Refund

Making a refund request for a specific order by MugglePay order ID.

Use it when the order status is PAID.

It's done by MugglePay payment page. ONLY use this if you want to build an in-house payment without redirecting.

***

## Definition

**POST** <https://api.mugglepay.com/v1/orders/:order\\_id/refund>

## Body Params

| Param     | Type     | Required | Description                                                        |
| --------- | -------- | -------- | ------------------------------------------------------------------ |
| order\_id | `string` | Yes      | MugglePay order ID. It's provided in the response of Create Order. |

## Example

```
curl -X POST \
  https://api.mugglepay.com/v1/orders/8cbe9c00-7b0d-4b03-816f-e88a3c6bfa5c \
  -H 'token: API_TOKEN_GET_FROM_ADMIN_PORTAL'
	
```


# AI Integration (Prompts for Cursor, Lovable, Bolt etc)

### Before Start

1. Register account with email / web3 address from <https://merchants.mugglepay.com/>
2. Get server API Keys&#x20;

## Cursor Integration Guide

Integrate MugglePay with Cursor, Windsurf, and other AI-assisted coding tools to add cryptocurrency payments to your existing applications.

### Quick Setup

Copy and paste this prompt into Cursor when you want to add MugglePay to your existing project:

```
I want to add cryptocurrency payment functionality to my existing application using MugglePay. 
Please help me integrate the MugglePay API into my current [React/Next.js/Node.js] application.

Requirements:
- Accept payments in USDT, USDC
- Support multiple blockchain networks (Tron, Ethereum, Arbitrum, Base)
- Handle payment callbacks and webhooks
- Implement proper error handling and user feedback

Tech stack: [specify your preferred stack]

API Documentation:
- Create Order: https://docs.mugglepay.com/order/createorder
- Payment Callback: https://docs.mugglepay.com/order/paymentcallback

Example API call:
curl -X POST https://api.mugglepay.com/v1/orders \
  -H 'Content-Type: application/json' \
  -H 'token: YOUR_API_TOKEN' \
  -d '{
    "merchant_order_id": "order_12345",
    "price_amount": 29.99,
    "price_currency": "USD",
    "title": "Premium Subscription",
    "callback_url": "https://yoursite.com/webhooks/payment"
  }'
```

### Code Examples

#### Direct API Integration

Since we don't have a package, you'll integrate directly with our REST API. Here are the actual API endpoints and examples:

**Create Order API**

```bash
curl -X POST \
  https://api.mugglepay.com/v1/orders \
  -H 'content-type: application/json' \
  -H 'token: API_TOKEN_GET_FROM_ADMIN_PORTAL' \
  -d '{
  "merchant_order_id": 100388,
  "title": "Grand AI Services fee",
  "price_amount": 10,
  "price_currency": "USD"
}'
```

**Response Format:**

```json
{
    "status": 201,
    "order": {
    },
    "payment_url": "https://invoice.mugglepay.com/invoices?id=94be2b2a-2905-4857-b701-b04e57e84593"
}
```

Redirect the page to the `payment_url`. If the user finishes payments, it will show the payment success.

**Advanced Order with Callback**

```bash
curl -X POST \
  https://api.mugglepay.com/v1/orders \
  -H 'content-type: application/json' \
  -H 'token: API_TOKEN_GET_FROM_ADMIN_PORTAL' \
  -d '{
     "merchant_order_id": "503a854998-6230-4338-adb7",
     "title": "Monthly Program x 1",
     "description": "Gaming for your family",
     "price_amount": 1,
     "price_currency": "USD",
     "pay_currency": "USDT_ARBI",
     "callback_url": "https://ecards.com/api/success",
     "cancel_url": "https://ecards.com/ecardstatus?status=cancel",
     "success_url": "https://ecards.com/ecardstatus?status=success"
}'
```

#### Basic Payment Button Component

```tsx
import { MugglePayButton } from 'mugglepay';

export function PaymentForm() {
  const handlePayment = async (amount: number, currency: string) => {
    try {
      const response = await fetch('/api/create-order', {
        method: 'POST',
        headers: { 'Content-Type': 'application/json' },
        body: JSON.stringify({
          price_amount: amount,
          price_currency: currency,
          title: 'Product Purchase'
        })
      });
      
      const result = await response.json();
      if (result.payment_url) {
        window.location.href = result.payment_url;
      }
    } catch (error) {
      console.error('Payment failed:', error);
    }
  };

  return (
    <MugglePayButton
      amount={29.99}
      currency="USD"
      onPayment={handlePayment}
      supportedTokens={['USDT_TRC20', 'USDC_ARB', 'ETH_BASE']}
    />
  );
}
```

#### API Route Handler

```typescript
// pages/api/create-order.ts
export default async function handler(req, res) {
  if (req.method !== 'POST') {
    return res.status(405).json({ error: 'Method not allowed' });
  }

  try {
    const orderData = {
      merchant_order_id: generateOrderId(),
      price_amount: req.body.price_amount,
      price_currency: req.body.price_currency,
      title: req.body.title,
      callback_url: 'https://yoursite.com/webhooks/payment',
      success_url: 'https://yoursite.com/success',
      cancel_url: 'https://yoursite.com/cart'
    };

    // Make direct API call to MugglePay
    const response = await fetch('https://api.mugglepay.com/v1/orders', {
      method: 'POST',
      headers: {
        'Content-Type': 'application/json',
        'token': process.env.MUGGLEPAY_API_TOKEN
      },
      body: JSON.stringify(orderData)
    });

    const result = await response.json();
    res.json(result);
  } catch (error) {
    res.status(500).json({ error: 'Order creation failed' });
  }
}
```

### API Reference

#### Supported Tokens

The `pay_currency` field is optional. If it's not set, users can select manually. Here are the supported `pay_currency` values:

* **USDT**: `USDT_TRC20`, `USDT_ERC20`, `USDT_ARB`, `USDT_BNB`, `USDT_CELO`, `USDT_TON`
* **USDC**: `USDC_ERC20`, `USDC_ARB`, `USDC_SOL`, `USDC_BASE`, `USDC_POL`, `USDC_XLM`

#### Callbacks

If the payment is successful, it will trigger a callback to your `callback_url` with the payment information. Check the Payment Callback documentation for more details.

### Supported Features

#### Cryptocurrencies

* **USDT**: Tron (TRC20), Ethereum (ERC20), Arbitrum (ARB20), Celo, TON
* **USDC**: Ethereum (ERC20), Arbitrum (ARB20), Solana, Base, Polygon, Stellar
* **ETH**: Ethereum (ERC20), Arbitrum (ARB20), Base
* **CUSD**: Celo Network
* **PYUSD**: Solana Network

#### Integration Options

* React components
* Next.js API routes
* Node.js/Express middleware
* Webhook handlers
* Payment callbacks

### Best Practices

1. **Error Handling**: Always implement proper error handling for network failures
2. **User Feedback**: Provide clear feedback during payment processing
3. **Mobile Optimization**: Ensure payment flows work well on mobile devices
4. **Security**: Validate all input data and implement proper authentication
5. **Testing**: Test with small amounts before going live

### Troubleshooting

#### Common Issues

**Payment not confirmed:**

* Check if the transaction is confirmed on the blockchain
* Verify the payment amount matches exactly (including fees)
* Ensure payment is made within the time window

**Integration errors:**

* Verify API credentials are correct
* Check network connectivity
* Review error logs for specific error codes

#### Support

For technical support:

* **Documentation**: API Overview
* **Merchant Portal**: <https://merchants.mugglepay.com/>
* **Email**: <business@mugglepay.com>

### Next Steps

1. **Choose your integration method** (CLI, MCP, or direct prompts)
2. **Set up your development environment**
3. **Create your first payment integration**
4. **Test with supported cryptocurrencies**
5. **Deploy and go live**

Ready to get started? Choose your preferred method above and begin building with VibeCoding!


# Self-managed (Non-Custodian)

**What is Self-managed Commerce?**

Self-managed Commerce is a non-custodial option for managing your crypto transactions. You have full control over your crypto balance. Please note that if you lose access to your addres, your funds will be irrecoverable, and MugglePay will not be able to assist in recovering your phrase or funds.

**Features of a Self-managed Account:**

* **Global Availability:** Accessible worldwide excluding OFAC-sanctioned nations.
* **Merchant Control:** You hold the private key (non-custodial).
* **Transaction Fee:** 0% per transaction.

**How to Sign Up:**

To create a Self-managed Commerce account: "[Register NOW!](https://merchants.mugglepay.com/)"&#x20;

**Supported Cryptocurrencies:**

MugglePay (**Self-managed Commerce)** currently supports major stablecoins:

* **On Ethereum:** Tether and USD Coin (USDT, USDC)
* **On Arbitrum:** Tether and USD Coin (USDT, USDC)
* On **Binance:** Tether (USDT bep20)
* On **Celo:** Tether and Celo Dollars (USDT, cUSD)

For those other tokens on Ton, Solana, Tron network, it's not supported on self-managed commerce yet, but it will be available on MugglePay.

**Cost of Using MugglePay Commerce:**

Using MugglePay Self-managed Commerce incurs a 0% transaction fee.&#x20;

**Withdrawing Crypto:**

Withdraw is not needed, and your registered account will be the one for withdrawals.

**Payment Covering**

If the buyer pays from crypto exchange, the payment amount might not be exact match. Please create a ticket if you want to disable the feature.

For example, when buyer pays the $100 invoice from Coinbase Commerce, the withdrawal fee is $0.2 for USDC. $99.8 will be received if the buyer forgot about the withdrawal fee. We will mark the invoice as completed even if it's underpaid within a reasonable range.


# Media Kit

### Media Kit&#x20;

<https://drive.google.com/drive/folders/15K6XEKylslGU-Tu1PGNIrxBYBUt_Ifk3>

### About&#x20;

MugglePay is a leading cryptocurrency payment gateway. Our non-custodial solution offers a seamless way to accept payments with instant settlement and 0% fees. We have partnership with major stablecoins like Tether and blockchains such as Arbitrum, Celo and Ton.

We integrate with major e-commerce platforms like Shopify, WordPress, WooCommerce and payment links. Merchants can start selling without knowing tech. MugglePay ensures secure, frictionless transactions while keeping merchants in full control of the funds. No account opening. No withdraw. No Chargebacks.

Twitter: <https://x.com/paymuggle>

Website: <https://www.mugglepay.com/>

Merchant Portal: <https://merchants.mugglepay.com/>


